FAQ
ANSWERS TO FREQUENTLY ASKED QUESTIONS (FAQ)
1) How to Register and Log-in?
Click REGISTER
Enter your Email ID
Enter your Call Sign (Home Call Sign)
Select your Country
Your Phone number, Grid Square and Postal Address (not mandatory)
Select a Password (case sensitive)(supports up to 15 characters, with no character limitations)
Re-enter your Password
Tick “I am not a robot” and select the suggested squares in the Captcha
Click SUBMIT
This completes your registration.
After this, you click on the login
Enter your Call Sign
Enter your password to log in.
2) How to upload a profile photo?
Log-in
Go to “My Account” and below that “My Page”
Click on EDIT PROFILE
Locate your photo file on your computer
Drag the photo file and drop on the green Camera Icon
Using the slider below that, zoom to the correct size within the circle
Click USE
3) How to fill up personal details?
Log-in, go to My Page, click EDIT PROFILE and fill up the rest of the details. If you did not know your Grid Square when you registered, you can fill this up now. If you have multiple call signs, you can enter those details.
4) What all personal details are displayed on Hamphotos?
Your Call Sign, Name, Profile Photo, and Country Flag are visible to any person looking at your page.
In addition, those who Log-in can see your Email ID, Phone number, Address, and Grid Square.
5) How to upload photos?
Keep the photos organized in a folder on your computer desktop
Note down the year of the event related to the photo.
First, Log in.
Click on UPLOAD PHOTOS
A long rectangular drag and drop window with a green border appears.
1.Uploading one photo at a time
From your computer folder, drag the photo file into the green window.
The photo appears in a small size in another window. (You can also browse and select a file)
Select the appropriate CATEGORY of the photo. (This is important for search and find later)
Enter the TITLE of the photo (Limited to 255 characters)
Enter the year of the event (if you do not know, put the current year)
Enter further details about the photo, including maximum keywords for search.
If you want to Tag somebody, enter the Call Sign.
Then click “POST”
2. Uploading multiple photos at a time.
Select multiple photos and drag and drop them to the window.
These photos will appear in the next window. (It may take some time depending upon the file size, number of photos, and your Internet bandwidth.)
Give any temporary short name say TRIAL
Give any YEAR
And click POST.
All the photos will appear on your page with the names Trial 1, Trial 2, Trial 3, etc.
Later select each photo, click EDIT and enter the correct Title, Year, details of the photo, etc.(This is important)
6) Is there any size restriction for photos to be uploaded?
Hamphotos encourage you to upload high-resolution photos. High-resolution photos can be enlarged and viewed in 3 steps. If you want your photo to be seen in detail (complicated circuit boards, construction details, etc.), you have to upload photos of large file sizes. 2.5 MB to 6 MB files are preferred. Hamphotos will accept files up to 10 MB size.
7) How many photos can be uploaded per person?
If your photos contain technical value related to Ham Radio, we do not want to put any limit in terms of the number of photos that you upload.
8) What kind of photos can be uploaded?
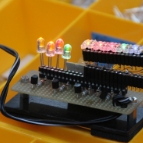
Photo of your Radio Shack, your QTH showing your antennae, your test and measuring equipment, photos of your local club meeting, Field Days, Antenna workshops, group photos with your Ham Friends, external and internal views of Transceivers, Amplifiers, repair and testing, PCB layouts, step by step home-brew activities, Antenna and Mast construction, Contesting, DX expeditions, mobile radio and mobile antenna installations, different scenic terrains showing your city/countryside, etc. can be uploaded.
At least 80% of the photos shall be directly related to Amateur Radio Service and communication technology. The rest of the photos can be about your other interest and hobbies, your pets, your family, etc.
Old photographs are also of good value if properly preserved and copied. It is better to create a separate album on your page for old, scanned photos. Better not to mix old and new photos.
9) Where will the photos appear on My page?
Photos selected under category My Radio Shack, My QTH, and My Antennae will appear on the top. These are the main place holders.
On uploading a photograph under the "My Radio Shack" category, and checking the "Set as Main Shack" option, the photograph would appear as a large image on your profile. Users can change the main shack by selecting a photograph under My Radio Shack Category and checking the "Set as Main Shack" option under the photo's Edit settings as well. The same process should be followed while uploading multiple photographs under this category.
10) What do I write under About me?
“About me” space is for typing some text about you. You can write about your areas of interest, how you got interested in this hobby and when you got your license etc. Please type this part preferably in English or give a translation in English using Google Translate.
11) How to add embedded video links on My page?
After you Log-in, go to My Page and click Add Video Links and a window will open.
Go to YouTube, Instagram or Vimeo and copy the link of the video on to your clipboard and paste the link in the window.
Add a Title for the video and add further description on the video.
Then click POST
The video along with the thumbnail photo will appear on your page.
12) How to create an Album on ‘My Page’ and move photos to that Album?
After Log-in, go to My Page.
On the right-hand side of My Photos, you will find Arrange my Photos.
Click on Arrange my Photos. A separate “Arrange my photos and Albums” window will open up.
Click on Create New Album
Enter the name for the new album and press CREATE.
Then select the new album so that it appears on the top of the My Photos General Folder.
Now select the photos which you would like to move to the newly created album. Drag the selected photos to the new Album.
Now return to My Page and view how the album looks like.
In this manner, you can create many albums within your page.
13) How to arrange the Albums?
To rearrange the albums, click on Arrange my Photos and on the Album window, drag and move the albums to change the order.
14) How many albums can be created?
Any number of Albums can be created on My Page.
15) How to rename an Album and how to delete an Album?
On My page, click on Arrange my photos and albums. When you move your mouse on an album, you will find 3 green dots. When you click on that, the EDIT and DELETE options will appear. You can click on EDIT and rename your album. If you select DELETE, you can delete an album from your page.
When you delete an Album, the photos from that album will not get deleted. Those photos will fall back in your General folder.
16) How to view a photo at different zoom levels?
When you click on a thumbnail of a photo from the Photos folder, it will enlarge and show at a medium resolution. For a small screen of a mobile phone or tablet, this resolution will be good to view. On larger screens such as a Laptop or a Desktop, you can click on that image again.
On the second click, the full-size file will be opened on a separate browser window. This may not be an enlarged view but will display the full photograph.
On a third click, a really enlarged view will be shown (if the file size/resolution is high enough)
17) How to navigate from one photo to another?
After you select and click on a thumbnail and viewing the photo,
you can use the Previous/Next floating buttons on the top right side.
Or you can use the left-right arrow buttons on your computer keyboard.
You can go back to the previous page using the floating “<back” button on the left top of the page.
18) How to share a photo?
You can select a photo and copy the link from the bottom of the photo by clicking on COPY THE LINK and go to another member’s page and send that link in the space for comments. Then you can add your comments also.
The copied link can also be shared in an email. The received link will display the photo from the Hamphotos page.
19) How to comment on a photo?
After you Log-in, select a photo from the Photos page or the page of another Member and you can type your appreciation, comment or questions in the space for comments and click POST. The other Member will see your comment when he/she logs-in.
20) What to do if I forget my Password?
The Log-in window has a ‘Forgot Password’ button. Click on that and enter your email ID using which you have registered on Hamphotos. The Hamphotos system will reset the password and send you a mail with the reset password.
After you log-in with the above password, you can change to your preferred password by going to My Account and then moving to the Change Password option.


Are You Sure?